h.264 / h.265 (MPEG-4, AVC, HEVC)
h.264 and its successor h.265, also called mp4 are widely used formats for video encoding. Both are similar but h.265 can achieve smaller files for the same quality, but is slower to encode.
h.264 is also referred to as Advanced Video Coding (AVC or sometimes AVCHD) or also as MPEG-4 Part 10.
h.265 is also referred to as High Efficiency Video Coding (HEVC) or sometimes as MPEG-H Part 2.
h.264 and h.265 streams are usually contained in dedicated .mp4 files or Matroska .mkv files. Both can be created with DuME, and it’s quick and easy to remux one into the other, by selecting the Copy option in the video settings of the output file node. Quicktime files (.mov) can also contain these formats.
Presets
DuME comes with a few output presets to let you quickly set the most common parameters for standard MP4 output.
All these presets are h.264 encoded for a wider compatibility.
- MP4: high quality, high compatibility standard
.mp4file. - MP4 HQ: even higher quality encoding, may be less compatible with some hardware due to high bitrates.
- MP4 High compatibility: standard quality, tweaked for the widest compatibility with all hardware and devices.
- MP4 Proxy: low quality, fast encoded and very small file, for quick previews and validation.
- MP4 Proxy intra: low quality, fast and intra-frame encoded file, for seekable quick previews and validation.
Quality and encoding settings
A few presets are available to quickly set common settings in this section.

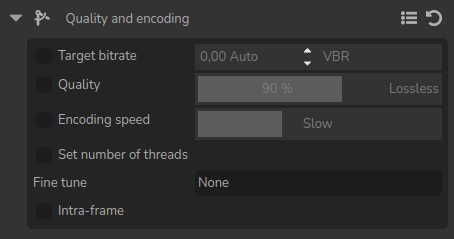
Target bitrate
You can set a target bitrate (i.e. number of bits per second, which is the same as choosing a file size if you now how long is the media); while this may be useful for specific hardware or streaming setup, in most cases you should prefer set the quality of the video (read below).
The bitrate can be constant (CBR), in which case it will not vary and will be the one you choose, or variable (VBR) and adjusted to maximize the output quality, with a lower bitrate during simple parts and a higher bitrate when needed during complex parts with a lot of motion. In case of variable bitrate, your setting the average bitrate of the video with this parameter.
Note
DuME doesn’t support multi-pass encoding, which is becoming less and less useful.
Multi-pass encoding is used with variable bitrate and is a way to approach the defined target bitrate as closely as possible. As the bitrate varies, with a single pass the file size and average bitrate may be a bit different than the specified target bitrate.
Running one or several passes before a final actual encoding pass would be used to precisely adjust the variable bitrate and match the target size. This may be useful if and only if you have a strict file size to achieve, which was the case when authoring CDs and DVDs for example but which is not the case anymore, so DuME doesn’t natively implement multi-pass encoding.
But if you do need multi-pass encoding, you can still use DuME to build a graph, then export it to a bash script which will be easy to adjust for multi-passes using FFmpeg. Read the FFmpeg documentation about h.264 two-pass encoding for more details.
Quality
Most of the time, when encoding a video file, you don’t really care about the file size, but about the quality of the video according to your use-case. What you need is for the video file to be as small as possible for the quality level you need.
In this case, it doesn’t make sense to set a specific bitrate but it makes much more sense to set a target quality and let the encoder adjust the bitrate for the file being as small as possible.
In DuME, you can very easily to that by using the quality parameter while leaving the target bitrate parameter disabled. DuME will then automatically adjust the bitrate: a slideshow of still images can have a bitrate much lower than a complex action movie to achieve the same quality.
When you set the quality, a percentage may seem quite abstract, but you can preview the encoding to adjust the setting: click the node in the editor and hit [P] or click Preview in the menu of the output node; DuME will show you the result of the encoding using the quality parameter.
When you set the quality to the maximum, you can achieve truly lossless compression.
Warning
Lossless compression with h.264 is not standard, and won’t play with most players.
Encoding speed
The speed setting will provide a certain encoding speed to compression ratio. A slower encoding will provide better compression (compression is quality per filesize). This means that, for example, if you target a certain bit rate, you will achieve better quality with a slower preset. Similarly, when using the quality setting, you will simply save bit rate by choosing a slower encoding.
Just use the slowest setting that you have patience for.
Fine tuning
You can further improve a bit the compression level and change the way the video will be decoded by fine-tuning the settings according to what you’re encoding.
- None: default, standard encoding.
- Film (h.264 only): use for high quality movie content; lowers deblocking
- Animation (h.264 only): good for cartoons; uses higher deblocking and more reference frames
- Video with Grain: preserves the grain structure in old, grainy film material
- Slideshow (h.264 only): good for slideshow-like content (still images)
- Fast decode: allows faster decoding by disabling certain filters
- Streaming (low latency): good for fast encoding and low-latency streaming
Intra-frame
h.264 and h.265 don’t fully encode all video frames, only a few keyframes per second are fully stored and only changes are encoded in between. Although this is a clever way to reduce the file size and works very well for playing the media in the end, it may also increase (a lot) the CPU or GPU load when decoding the video file in editing, compositing and post-process applications like Premiere, After Effects, Resolve, etc.
The Intra-Frame option can be used to improve decoding performance with non-linear editing software such as Adobe Premiere, Avid Media Composer, DaVinci Resolve, or even Adobe After Effects, but may result in a bigger file. This option also enables frame-by-frame playback with most players and makes the video quicker to seek in.
Note that intra-frame encoding for h.264 is not standard and the video may be incorrectly decoded in some applications.
Profile and level
With h.264, you can set the format profile and level. These settings can be used for retro-compatibility with older hardware. Refer to your hardware specifications to know which profile and level you should set, or let DuME handle this for you.
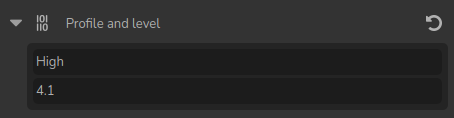
These are the three profiles you can select in DuME:
- Baseline: Primarily for lower-cost applications with limited computing resources, this profile is used widely in videoconferencing and mobile applications.
- Main: Originally intended as the mainstream consumer profile for broadcast and storage applications, the importance of this profile faded when the High profile was developed for those applications.
- High: The primary profile for broadcast and disc storage applications, particularly for high-definition television applications (this is the profile adopted into HD DVD and Blu-ray Disc, for example).
There actually exist three other profiles derived from the High format for the h.264 encoder: High 10, High 4:2:2 and High 4:4:4, and DuME will select the right one automatically according the desired pixel format you may have set, if you’re using the High format.
You can also select the level, depending on your needs. If you don’t know what this means, leave the selection to “Auto” and let DuME choose the righ level according to your resolution and pixel format.
h.265 / HEVC
There are codec profiles for h.265 / HEVC, but they can be automatically be chosen according to the pixel format you’ve set in DuME. If you actually need to set a specific profile, add a custom FFmpeg parameter in the output file node, with -profile:v as parameter and one of these values:
8bit profiles
- main, main-intra, mainstillpicture
- main444-8, main444-intra, main444-stillpicture
10bit profiles
- main10, main10-intra
- main422-10, main422-10-intra
- main444-10, main444-10-intra
12bit profiles
- main12, main12-intra
- main422-12, main422-12-intra
- main444-12, main444-12-intra
There also exists a level for h.265, but you should never have to set it as the encoder will detect the right one for you.